Finding it difficult to create a WordPress website? Fear not, we’ve got you covered!
Creating a WordPress website is a great way to share your thoughts and ideas with the world or to start a business online.
WordPress provides a user-friendly interface, customizable themes, and a vast ecosystem of plugins to build the perfect website.
Check out our ultimate step-by-step guide on how to create a stunning WordPress in 3 steps.
So grab your creative spirit, and let’s begin.
What is WordPress?
WordPress is a content management system (CMS) that simplifies website building. The user-friendly interface makes it easy for people with no technical skills to build and manage their websites.
This website builder has features such as design flexibility, extensive customization options, and a vast plugin architecture, making it one of the most popular choices.
And the best part is it’s FREE!
Why Choose WordPress for Creating Your Website?
WordPress has an extensive library of themes and plugins, providing limitless customization options for various needs and styles.
Here are some primary features of WordPress:
- Customizability: A wide range of themes and plugins that allow websites to be customized and extended with additional functionality.
- SEO friendly: It’s optimized for search engines and has several plugins to help improve a website’s visibility in search results.
- Cost-effective: Being an open-source platform, you can use it for free.
- Secure: WordPress is a secure platform and is regularly updated to fix security issues.
- User-friendly: An engaging interface that lets you easily add content, images, and videos to your website.
Overall, WordPress is a powerful platform for creating websites, catering to both beginners and experienced users.
What are the Requirements to Create a WordPress Website?
Creating a WordPress website is a simple task that can be accomplished with minimal requirements. The most important resources to build a website are a domain name, a hosting provider, a visually appealing theme, and plugins for customization.
These resources help in building a solid and SEO-friendly website. Whether you’re creating a blog, an e-commerce site, or a corporate webpage, you require a few essential components to get started.
To bring your website’s vision to life, we must consider several key prerequisites. That is why we have curated a 3-step roadmap for building your dream website as follows:
- Select a domain name and hosting provider.
- Installing WordPress, themes, and plugins.
- Adding content and taking your website live.
Without further ado, let’s begin!
Step 1: Get Domain Name and Hosting Service
Domain names are unique addresses used to locate websites and resources online. Your domain name should reflect your brand and must be easy to remember.
Example of a domain name: cyberchimps.com
Get a clear idea of your domain needs. Recognize your budget, domain type (.com or .org), and any other additional services (SSL, Hosting, or e-mail service).
Select a proper relatable domain name since it impacts search engine rankings and visibility.
Check out the best domain registrars to make an informative choice on selecting a host.
What is WordPress Hosting?
WordPress hosting is a specially designed hosting service tailored to meet the unique requirements of WordPress, thereby helping you create a high-quality website.
WordPress hosting provides faster load times, better resource allocation, and improved overall performance.
Things to look for in a hosting provider:
- Performance: Server performance directly impacts the overall user experience, website functionality, and search engine rankings.
- Server Uptime: Server uptime directly affects the accessibility of a website. Choose a service provider with a reputed track record offering 99.9% server uptime or more.
- Staging: It creates a testing environment, a live replica of your website, that allows you to test and review changes to your site. You can check or test any modifications in a controlled environment before implementing them on your live site.
- Costing: Ensure your hosting provider is transparent about their pricing structure. Check out pricing and revival plans and look for hidden fees or extra charges.
Check if the host offers a money-back guarantee if you’re unsatisfied with their service. Also, if your website has minimal requirements, you can opt for free hosting.
We recommend using HyperHost for its lightning-fast, secure, and fully optimized servers that are easy to set up & manage.
HyperHost – Web Hosting You Can Rely On!

HyperHost is known for its reliability and trustworthiness. They offer users a secure platform to host their websites.
This hosting provider is designed to meet the needs of individuals and businesses seeking consistent performance, robust security measures, and reliable uptime.
Features Of HyperHost Web Hosting
- Auto-scaling cloud servers – the quickest hosting optimized for WordPress, Linux & Windows, regardless of the traffic.
- Free automated daily backup for your databases, emails, and website files.
- Free migration tool to migrate your websites in a few clicks.
- Email Management – create & manage your emails from a user-friendly dashboard.
- WordPress Staging Site – develop your website with a one-click WP staging tool.
- Inclusive of wildcard SSL certificates for all your hosted sites at no extra cost.
- WordPress tools dashboard – features that simplify your WP management from HyperHost’s control panel.
HyperHost Pricing: You can purchase a HyperHost starter plan (1 website) for $79.00 and grab an additional 25% discount with DealCLub.
After choosing a domain name and a good hosting platform, you can start building your website.
Installing WordPress
Once your domain name and web hosting are set up, you can install WordPress on your hosting account.
The easiest way to install WordPress is by visiting your hosting account, as they offer a one-click installation process that makes it easy to start with WordPress.
Manual Installation: If your web host doesn’t offer an automatic WordPress installation, you can install it manually by downloading the software from the official website.
Once you’ve installed WordPress, the next few steps are essential as they define the performance of your website.
Step 2: Install Responsive Starter Templates Plugin
A well-designed and visually appealing theme enhances the website’s aesthetics and creates a positive first impression.
Your WordPress theme influences user experience, performance, security, and the overall success of your website. That is why we recommend using the Responsive Starter Template Plugin, a popular and versatile plugin perfect for building any kind of website.
You can highlight your website’s design and functionality using the following features:
- 100+ templates for creating the website of your choice.
- One-click import option.
- Customize multiple templates to build a unique one.
Responsive Starter Templates plugin has fully functional and professionally designed ready-to-use website templates for the Elementor page builder and WordPress block editor.
Let’s begin the installation process.
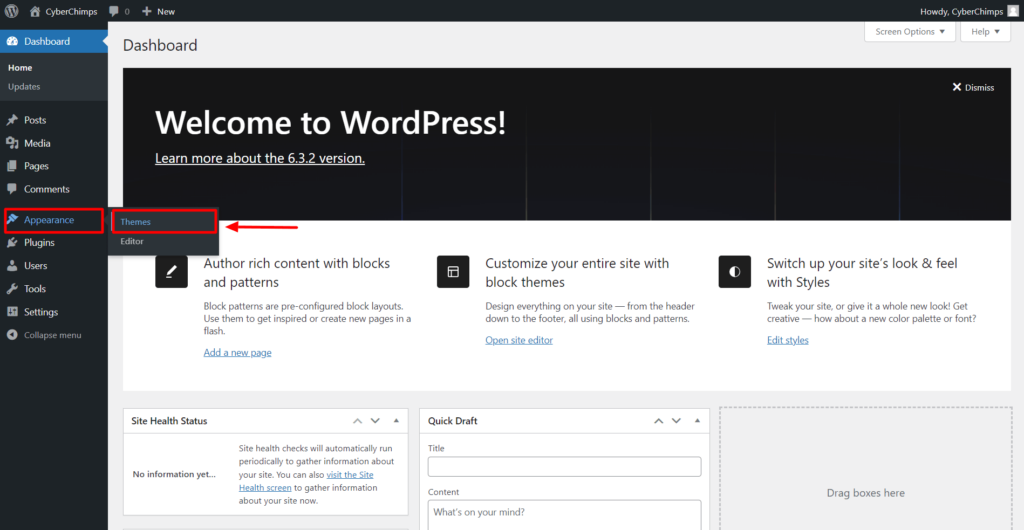
In your WordPress dashboard, navigate to
1. Appearance>Theme.
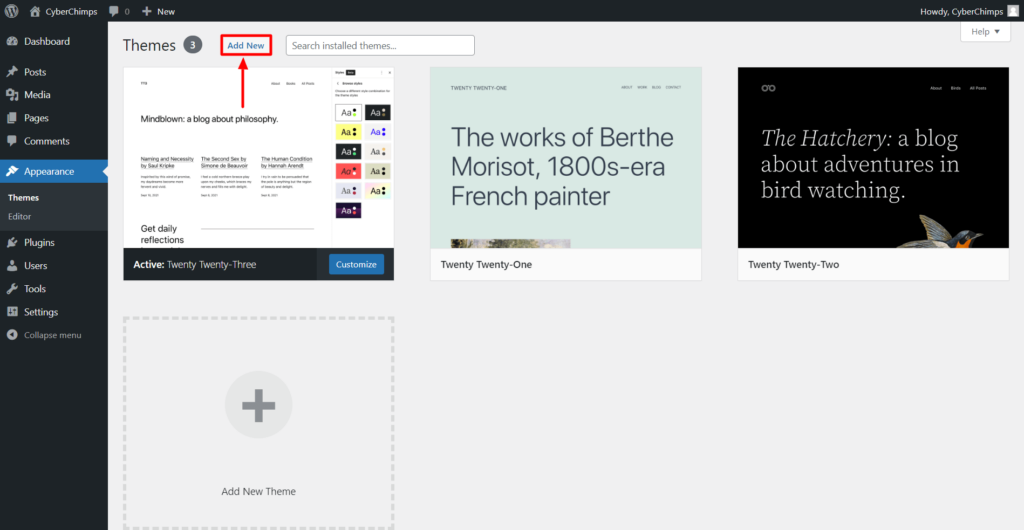
2. Click the Add New button.
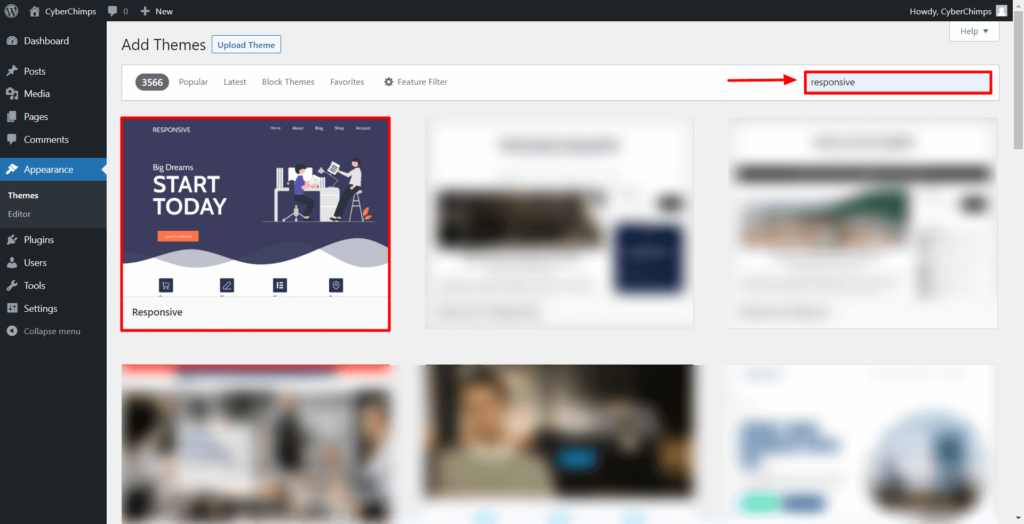
3. Search for Responsive in the search bar.
4. Install and Activate the Responsive Theme.
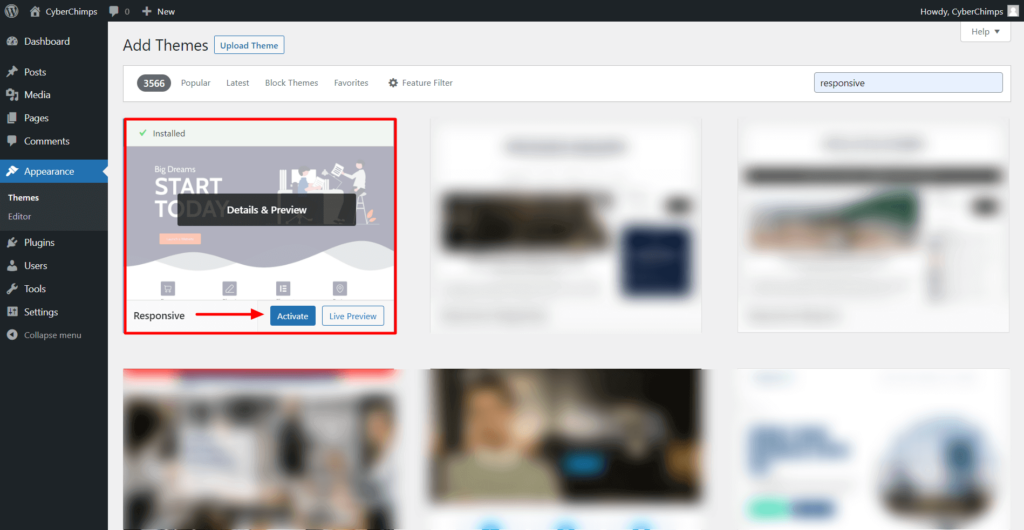
You have successfully installed the Responsive Theme. Let’s move ahead to install the Responsive Starter Templates Plugin.
5. Navigate to Plugins>Add New.
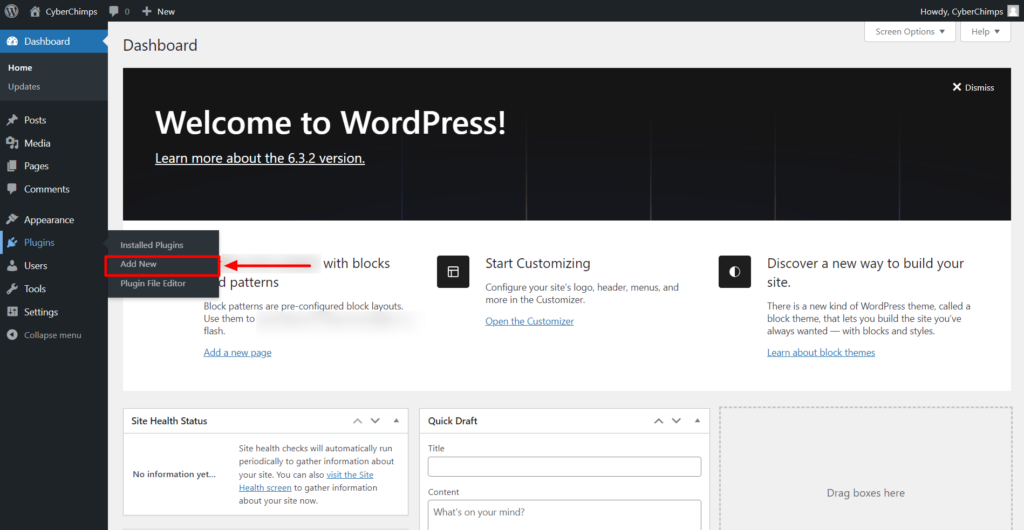
6. Search for Responsive Starter Templates in the search bar.
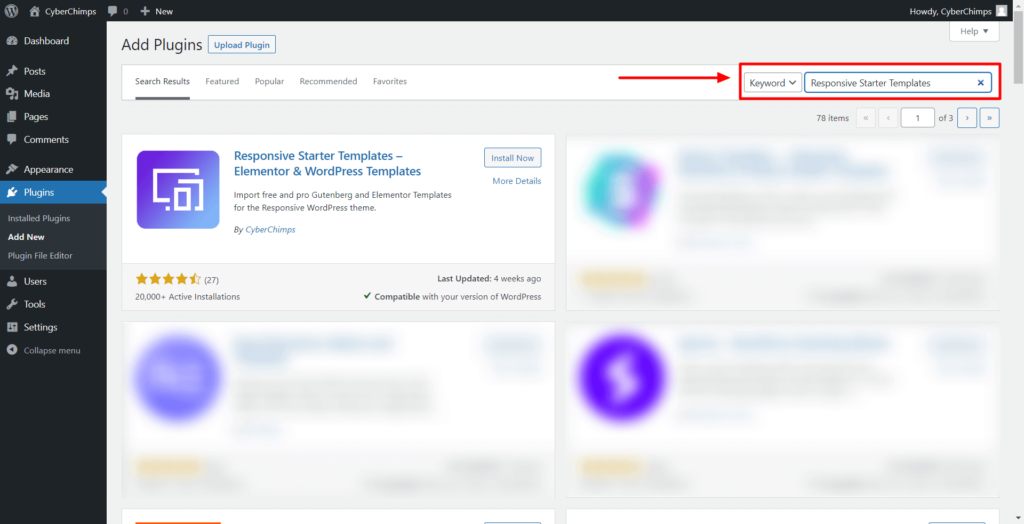
7. Click on Install and then Activate.
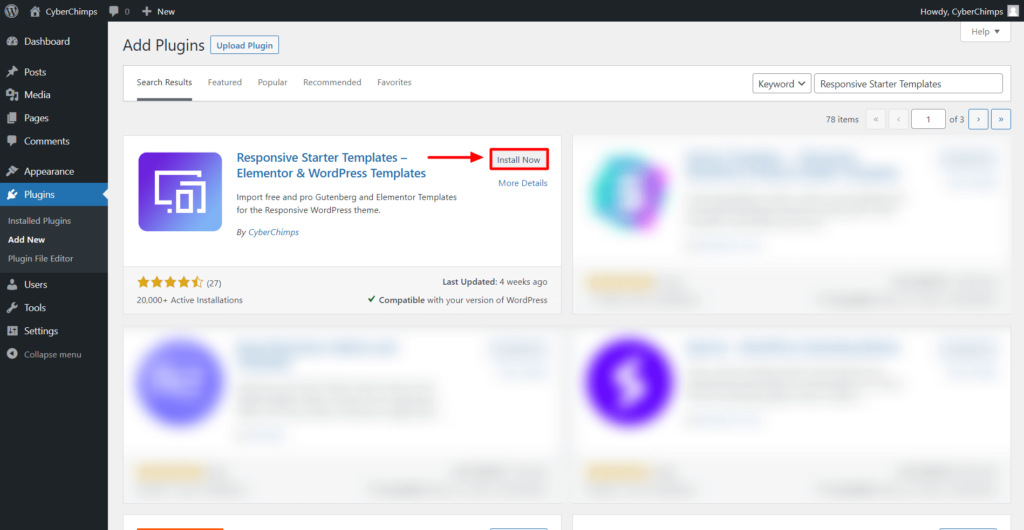
8. Your Responsive Starter Template Plugin is now active.
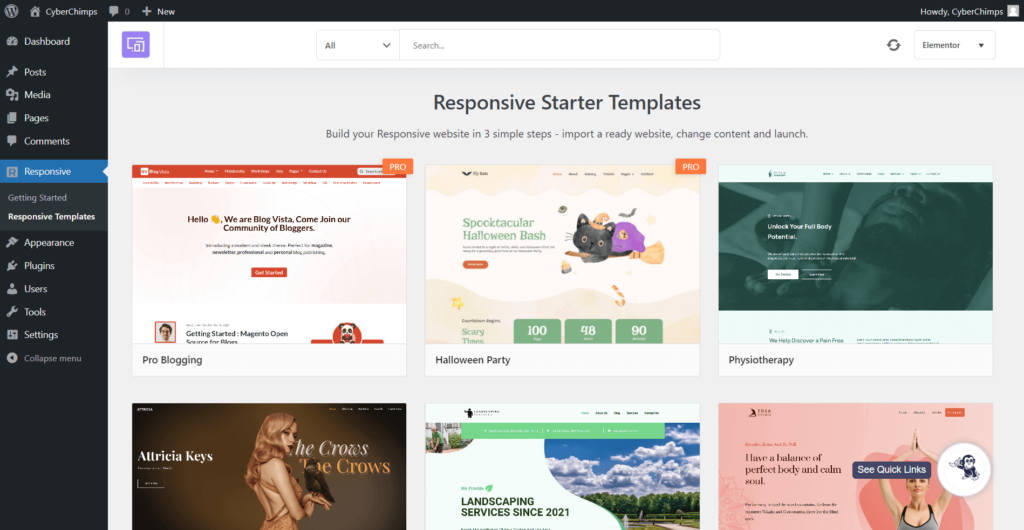
9. After activating the plugin, go to the Responsive Templates and search for a template that best matches your website’s vision.
Preview the template and click on the Import site button.

That’s it. Your template is successfully imported into your WordPress website.
Customize Your Header and Footer with Theme Customizer
Once you have launched the template, you can choose from different settings to customize the header and footer of your website.
Responsive theme provides plenty of settings to customize the typography, color combinations, layout options, and sidebar widgets to match your website requirements.
To edit, click on the “ Customize “ button.

Responsive gives you several options to customize your header’s alignment, menu, transparency, colors, and background. Similarly, using the footer settings, you can rearrange footer elements, add social links, add buttons, and many other functions.

Once done, you can easily move on to the next step of editing the page content.
Step 3: Edit Your Content with Elementor/Gutenberg Editor
Editing your content with Elementor or Gutenberg Editor is a breeze! Here’s a simple guide to get you started:
Editing Content Using Elementor
Navigate to your website and click on Edit with Elementor.
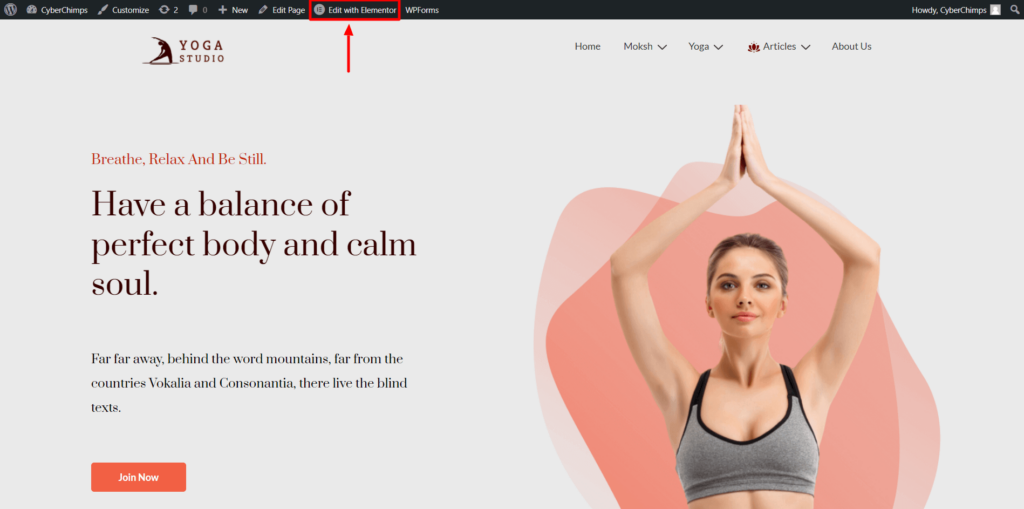
Elementor is an essential plugin that lets you easily customize your WordPress website.
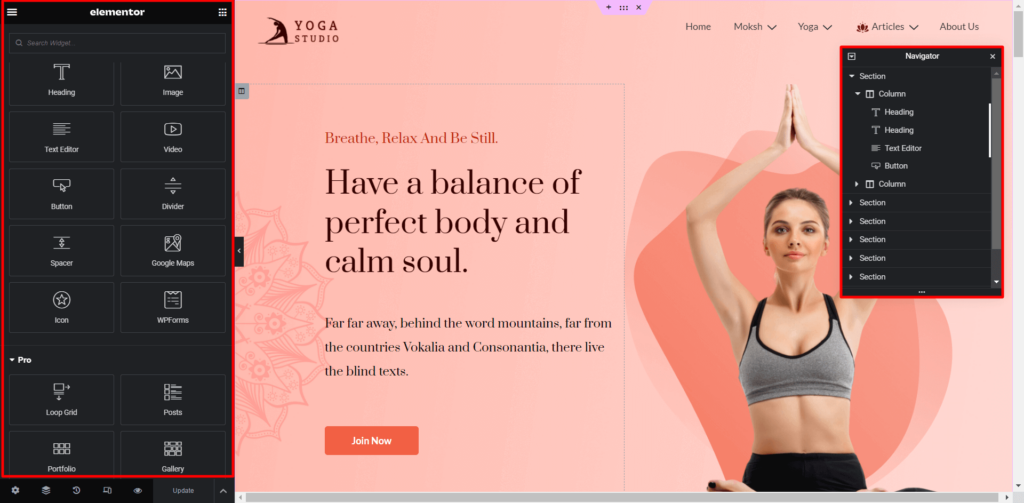
With Elementor, you can simply drag and drop the required elements into the main panel, which directly gets reflected on your website.
Using Elementor editor, you can:
- Edit Content: You can easily edit text, images, and other elements with a simple click.
- Add New Elements: Drag and drop elements onto your page and customize them to suit your needs.
- Style and Design: Elementor provides extensive styling options. Customize fonts, colors, spacing, and more using the Style tab.
- Preview and Save Changes: Before finalizing your edits, use the preview button to see how your page will look. Click “Update” to save your changes.
Overall, Elementor is a powerful tool for anyone looking to create and manage their websites easily and efficiently.
Editing Content Using Gutenberg Editor
Click on the Edit button to enter the Gutenberg Editor.
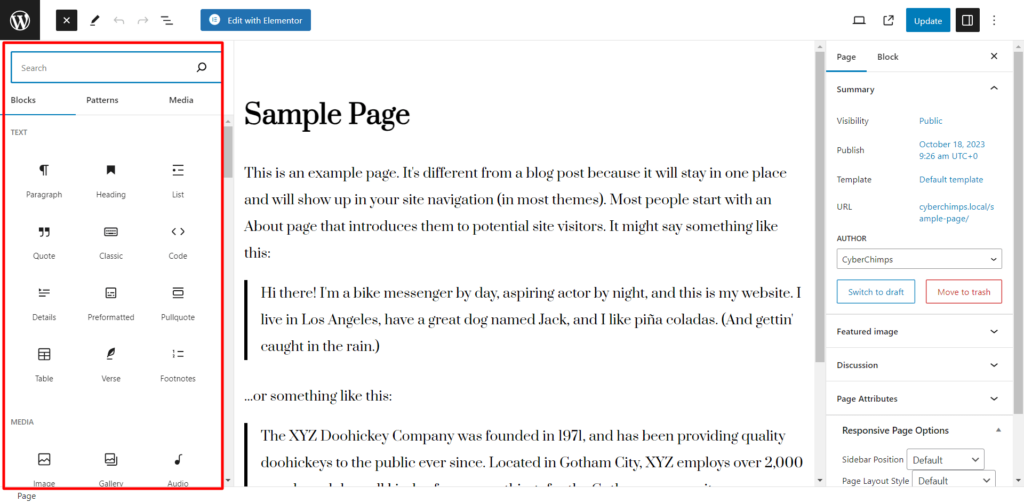
Blocks in Gutenberg allow easy editing. Each block has settings like alignment, text formatting, and block-specific options on the right sidebar.
Click the Update button to save your changes and go live with your website.
Whether you use Elementor or Gutenberg, both editors offer powerful tools for creating and customizing your content in WordPress.
Essential Plugins for WordPress Websites
We can use plugins to bring out the full potential of a WordPress website. They can be a mighty addition to enhance the functionality and user experience.
Check out the top 3 recommended plugins to power up your wordpress website:
Responsive Elementor Addons
Responsive Elementor Addons (REA) is a popular WordPress plugin that enhances your Elementor experience. With REA, you can access 50+ performance-optimized widgets that help build beautiful websites.
It focuses on delivering a seamless and smooth design experience using a set of advanced widgets and features.
Don’t worry about your website loading speed, as Responsive Elementor Addons is a masterpiece of speed and is compatible with most themes.
Features of Responsive Elementor Addons (REA):
- Custom Styles for Contact Forms: REA offers stylers for popular contact forms so you don’t compromise your contact form designs due to a lack of styling settings.
- Cross-Site Copy & Paste: You can simply copy and paste any website’s text, images, blocks, or even complex layouts without any hassle.
- Navigation Menu: You design every aspect of your website. Build stunning Headers and Footers with ease!
- Gallery Widget: Display images in Grid, Masonry, and Carousel layouts. There are even more Filterable Galleries that let users choose categories.
- Posts Layout Customization: Create beautiful, easy-to-customize, and filterable posts with the post widget. Use the powerful query builder to showcase your posts in different layout styles like grids and carousels.
- Toggle On/Off Widgets: Easily switch and customize widgets with our Toggle On/Off Widgets to control your website’s appearance effortlessly.
- Customer Support: Regular updates and unmatched support with detailed documentation.
Furthermore, use Responsive Elementor Addons SEO widgets to help you rank websites on the Search Engine Results Page.
With these features and more, Responsive Elementor Addons bring endless possibilities to your web design.

Responsive Blocks offers a library of fully functional blocks that extend the customizability and functionality of your WordPress block editor. Create professional website content layouts with free templates. Use the pattern import feature to add preferred pages and section layouts.
Check out the highly customizable and feature-rich WordPress blocks to help you design pages or posts without a single line of code:
- 50+ Blocks: Advanced columns, advanced heading, advanced text, section block, info-block, image boxes, table of contents, icon-list, shape-divider, and more
- Animation Blocks: Flip box, image slider, image hotspot, accordion block, post carouse, testimonial, multi buttons, call/mail button, inline notice block, wp search, and more.
- Section Blocks: Spacer, divider, tabs, blockquote, call-to-action, card, expand/show more, video popup, google map, progress bar, post grid, page grid, feature grid, and more.
- Woocommerce Blocks: Pricing list and pricing table
- Social Blocks: Instagram feed and social share
- Timeline Blocks: Count up, countdown, content timeline, post-timeline, and more.
With more than 50+ creative blocks, you can design beautiful pages without writing a single line of code, and the settings are easy to customize to create the desired look for your website.
WP Legal Pages is a popular legal page generator plugin that you can use for your WordPress website.
With WP Legal Pages, you can create professional legal pages like privacy policies, terms of use, terms & conditions, eCommerce returns & refund policies, affiliate disclaimers, and more.
Features and Benefits of WP Legal Pages
WP Legal Pages has over 25+ expert-vetted legal pages and over 3,70,000 downloads. Additionally, bloggers, affiliate marketers, corporate websites, e-commerce stores, and consultants use WP Legal Pages for its ease of functionality and legal compliance.
Let’s explore more features:
- Library of Legal Templates: WP Legal Pages Pro offers a wide selection of pre-designed legal templates, including privacy policies, terms and conditions, disclaimer statements, and more.
- Announcement Banner: Display announcement banners on your website whenever any legal pages have been updated.
- Responsive Pop-Ups: WP Legal Pages offers an option to create functional and responsive popups. These pop-ups can showcase forced agreements or privacy policies to the users.
- Cookie Bar: You can add a cookie bar on your website to inform visitors about the cookies you use and the information you collect.
- Guided Wizard: This interface guides you to add necessary sections to your policy pages, making the process seamless.
WP Legal Pages simplifies the process of creating a legally compliant website. Moreover, it offers a range of features that help protect your website interests and improve transparency with your audience.
Furthermore, with WP Legal Pages, you can create custom legal pages to keep your website secured. Get tailored pages like privacy policy, cookie consent, copyright policy, and more on a single platform.
Promoting Your Business Website
Check out some of the best practices to promote your business website:
Search Engine Optimization (SEO):
- Use relevant keywords in your content, meta tags, and headers to improve your website’s visibility.
Social Media Marketing:
- Share engaging content, run targeted ads, and interact with your followers on platforms like Facebook, Twitter, Instagram, and LinkedIn to connect with your audience.
Content Marketing:
- Blog posts, articles, videos, and infographics can showcase your expertise and increase traffic to your site.
Online Advertising:
- Invest in online advertising, such as Google Ads or social media ads, to reach your ideal and targeted customers.
Online Reviews and Testimonials:
- Encourage satisfied customers to leave positive reviews on your website.
Remember to track and analyze what strategies are best suitable for your business. Often, a combination of different methods yields the best results.
Good luck.
Wrapping up!
Congratulations on creating your very own WordPress website! You are a step closer to achieving your online goals.
But remember, the journey doesn’t end here.
Regular updates, security measures, and content optimization will ensure your WordPress website remains optimized.
Explore additional plugins, experiment with different themes, and stay updated with the latest trends in web design.
We recommend using the Responsive Starter Templates for its impressive features, ease of use, and value for money.


